By: Dick Russ
It is not uncommon to
read or hear from E-Type owners about the problems they have had with the
Lucas Alternator as well as the 3AW ignition warning light system, You
know the relay under the heater box that looks like a turn signal flasher.
This relay turns off the little ignition red light on your speedometer
when the alternator comes on line. As an E-Type owner for over 38 years
I have also restored 14 E-Types and hope I can speak with a little authority.
If nothing more as a retired aerospace engineer one of my pet annoyances
is when things become so unreliable you can no longer trust them. This
brings me to the Lucas alternator and E-type electrical system.
I'm sure there are many
of you that have been fortunate to have not encountered problems with the
Lucas Alternator or the 3aw Ignition warning light relay. I also suspect
there are just as many owners that have. It is the latter of you that I
write this article. So if you drive your E-Type and it has a 12 volt negative
ground system, this may be just what you need.
Over the years, on my own E-Type I have had to replace two Lucas Alternators as well as a couple of the 3AW relays. During my restoration of my 1970 E-Type a few years back I decided to bite the bullet and buy a new (remanufactured) Lucas Alternator as well as the latest state of the art SS3AW relay from CoolCat.
For the last two years
my electrical system has performed almost flawlessly. I have had to replace
the 3AW relay again, but other than that no problem. That is until this
past week. The ignition warning light stopped illuminating when I turned
on the ignition key. My first thought it was the bulb. Fortunately access
to that bulb is very easy. It was no more than to remove one screw holding
the Hardura on the left underside of the instrument panel and carefully
remove the lower ignition light bulb assembly from its socket on the back
of the speedometer. Sure enough the lamp was burned out. I had a spare
bulb so that should be an easy fix. That is until I turned on the ignition
switch and saw that I still had no light illuminating. With that said,
I assumed it was a failed 3AW relay so I immediately ordered a new SS3AW
relay. Fortunately that wouldn't prevent me from driving the car if needed
A few days later the relay arrived and after installing it, the lamp illuminated with the ignition key on and as soon as the car was running the light extinguished like it should at least for a few minutes . It then lit up again with the engine running; then went out (no light). I then turned off the engine and found I had no light with the ignition switch on. The first thing I did was to remove the black/brown (NB) from the 3aw relay and ground it to the chassis. The light cam on so it had to be a bad 3AW relay. Sure enough, it was fried! The control for this relay is from the ALT terminal on the back of the alternator. Then with the engine running I checked the voltage at this terminal which should be 7-7.5 volts. What I found was it was putting out over 15-16 Volts which is what fried the 3AW relay as well as burned out the original bulb. The only way to have voltage more than 7.5 volts at the ALT terminal is one or more failed diodes inside the alternator.
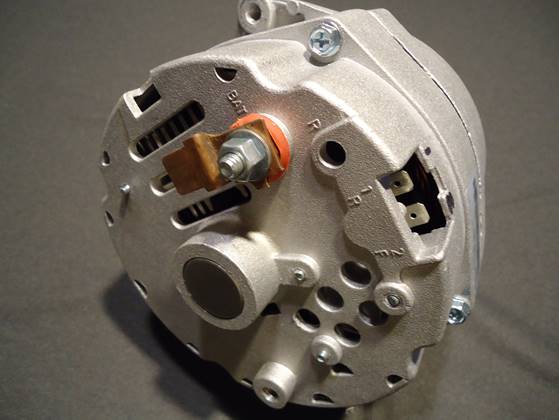
This is when I said to myself; enough is enough. My first thought was it is rare that anyone complains about the GM Delco alternators. I'm sure there are cases of a random Delco failure but for most part it is rare and a new Delco alternator would certainly be an improvement over the Lucas system.
After researching about all the alternators available, I found a new Delco 12 volt model 10SI 63 Amp 3 wire internally regulated with external fan and pulley on Amazon marketed by Parts Player for $58.06 (incl. shipping). This Delco alternator P/N 7127-12N was used on the 1969 Corvette. The only problem is the adjustment bolt fitting is on top of the alternator whereas the Lucas is around the 10 O'clock position which means a new adjusting bracket. The up side to this installation is it is internally regulated, which means I could bypass the cars existing regulator as well as the 3AW Relay. The new alternator will still turn off the ignition warning light and provide the voltage output regulation as well.
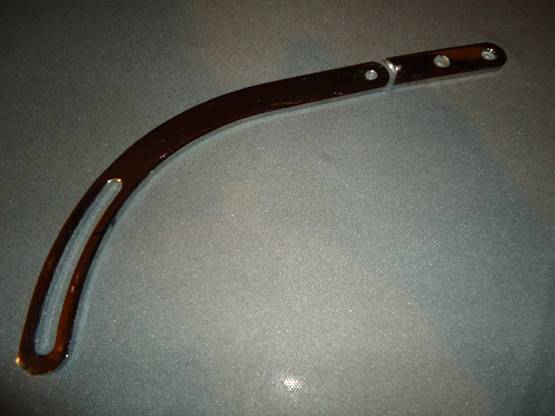
Like I said, the new
installation would require a new curved adjusting bracket. Since I had
been surfing Amazon for an alternator I did the same for a new curved adjusting
bracket which I found for $11.95 including shipping. It is a Universal
Chrome Steel SBC&BBC Bracket marketed by Pirate MFG. It was chrome
plated but could easily be painted if you prefer.
With parts on order I had time to study the wiring schematic and came up with a simple way to install the new alternator without altering (so to speak) the E-Types existing wiring.
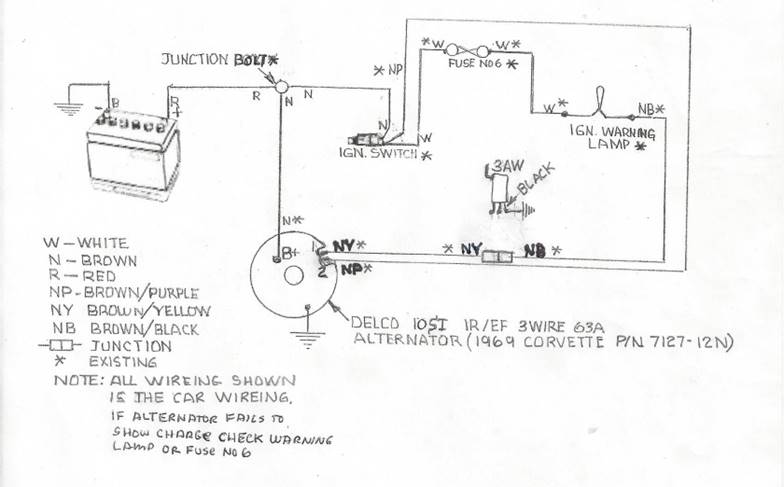
On the E-Types there are three wires connected to the 3AW relay. A brown/yellow (NY) wire, a brown/black (NB) wire and a Black ground wire. All three wires have female connectors. For the installation to work the brown/yellow wire needs to be connected to the brown/black wire. The easiest solution is to remove the female connector on the Brown/Black wire and crimp on a male connector. Then you can connect NB wire to the NY wire. The other end of the NY wire was/is connected to the ALT terminal on the Lucas alternator and will now be connected to the #1 terminal on the new Delco alternator. On the back of the Lucas Alternator you will find it has/had two small 18 gage brown/purple (NP) wires connected to the field terminals and a large 10G wire connected to the B+ terminal on the alternator. On the new Delco alternator you will only use one of the 18 gage brown/purple (NP) wires.
Note: only one of the two brown/purple wires (BP) will have 12 volts at the connector when you switch on the ignition switch (the other will not be used) and should just be stowed out of sight.
The wire with voltage
is the wire you need to connect to the #2 terminal on the Delco Alternator.
The large 10 gage brown wire connects to the B+ terminal on the new alternator.
I found it works great if you remove the large flat copper spade terminal
from the Lucas alternator and install it on the new Delco Alternator. Then
all you need to do is push the 10 gage wire onto the terminal.
When you get the new
universal adjusting bracket you will need to shorten it by 3.5 inched and
drill a 5/16 dia. hole to fasten it to the bracket mounting boss on the
alternator mount on the engine. (see the photo).
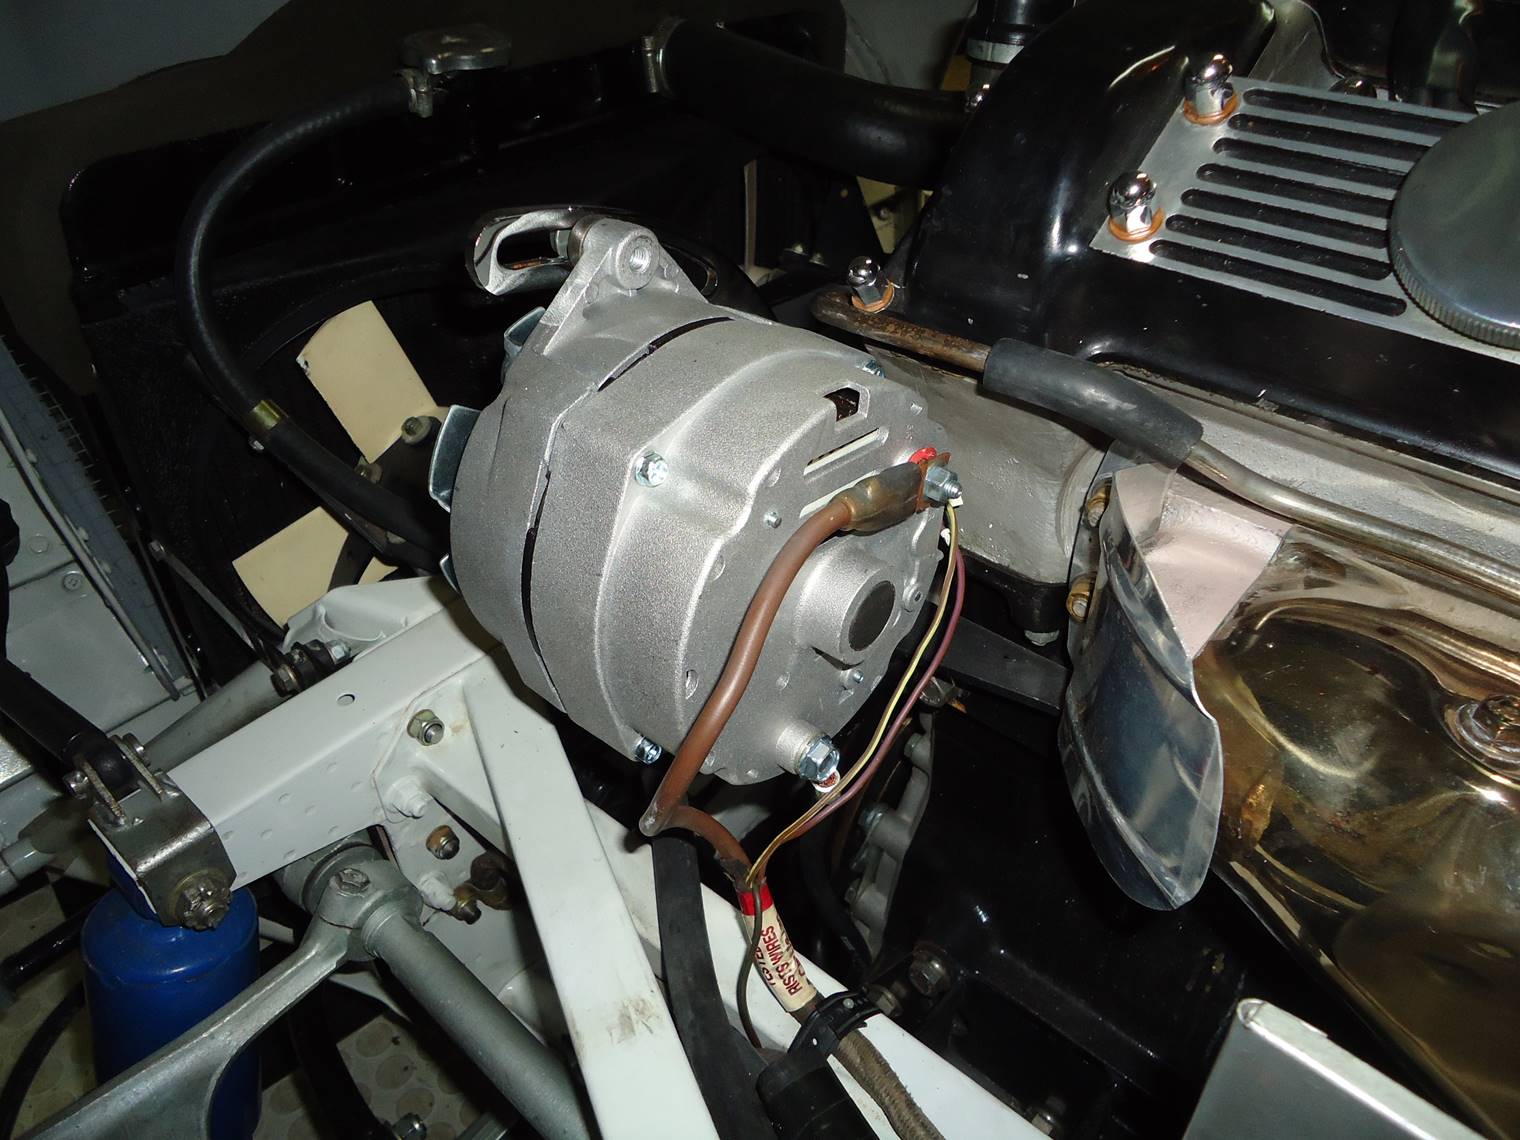
Now the best part of
all this is the new Delco alternator is a perfect fit in the existing Jaguar
alternator bracket and even uses the same belt (if it is a 33 inch belt)
as well. This was the easiest installation I have ever made. Be sure to
save the small spacer removed from the original adjusting bracket because
when the new curved bracket is installed it is approximately ¼ inch
from the alternator where it attaches. I would recommend you buy a 12 inch
ground cable and ground the new alternator to the engine. The new alternator
comes with a grounding location and bolt,
Now I have to tell you about the down side of this installation. The electrical circuit to excite the field coils on the alternator is provided current from the 12 volts brown/purple wire on the #2 terminal. The brown/yellow (wire on the #1 terminal completes the circuit through the ignition warning light in the speedometer. When the alternator come on line, the current at the #1 terminal is electrically interrupted and the ignition light is extinguished. Sounds simple enough. The problem is if the bulb burns out, the field circuit cannot be completed and the alternator will not provide a charge; that is until you replace the bulb which is very easy because you can easily reach the bulb from under the left side of the panel. This in itself is not really a problem because the bulbs will normally last for years. But you do need to keep a spare bulb in the car just in case it does fail. If it fails again, the problem is within the alternator which is under warranty. Fortunately a new one is only $58.00 and normally the repairs much less. Being a Chevrolet alternator you will always be able to find one at any parts store.

I have included a small schematic showing all the circuits and connections as well as several pictures of the installation. If you have any questions I will always be glad to help. You may reach me at dickathometwo@yahoo.com